TL;DR:
- Color and cracks are universal indicators for consistent home coffee roasting outcomes.
- Basic tools like an air popper or oven are sufficient for beginners to achieve quality roasts.
- Paying close attention to visual and auditory cues ensures better control and prevents over or under-roasting.
Home roasting sounds like the ultimate coffee flex, but most beginners hit the same wall: one batch tastes bright and fruity, the next is flat and smoky, and you have no idea why. The difference between a café-worthy cup and a disappointing one often comes down to two simple cues, color and cracks. These universal indicators tell you exactly where your beans are in the roast, regardless of your equipment or bean origin. This guide walks you through the tools you need, a clear step-by-step process, common mistakes to avoid, and how to check your results so every batch gets better than the last.
Table of Contents
- What you need to start roasting coffee at home
- Step-by-step coffee roasting process
- Troubleshooting and avoiding common mistakes
- Checking your roast: benchmarks and quality cues
- Our take: why color and cracks are your roasting shortcut
- Elevate your coffee journey with Third Space Coffee
- Frequently asked questions
Key Takeaways
| Point | Details |
|---|---|
| Color and cracks matter | Watching bean color and listening for cracks ensures consistent home roasts. |
| Start simple | Basic equipment and keen observation are enough for great results. |
| Troubleshoot with cues | Recognize common mistakes and fix them by checking color, cracks, and aroma. |
| Benchmark and adjust | Use empirical color stages to reliably improve your home roasting batch after batch. |
What you need to start roasting coffee at home
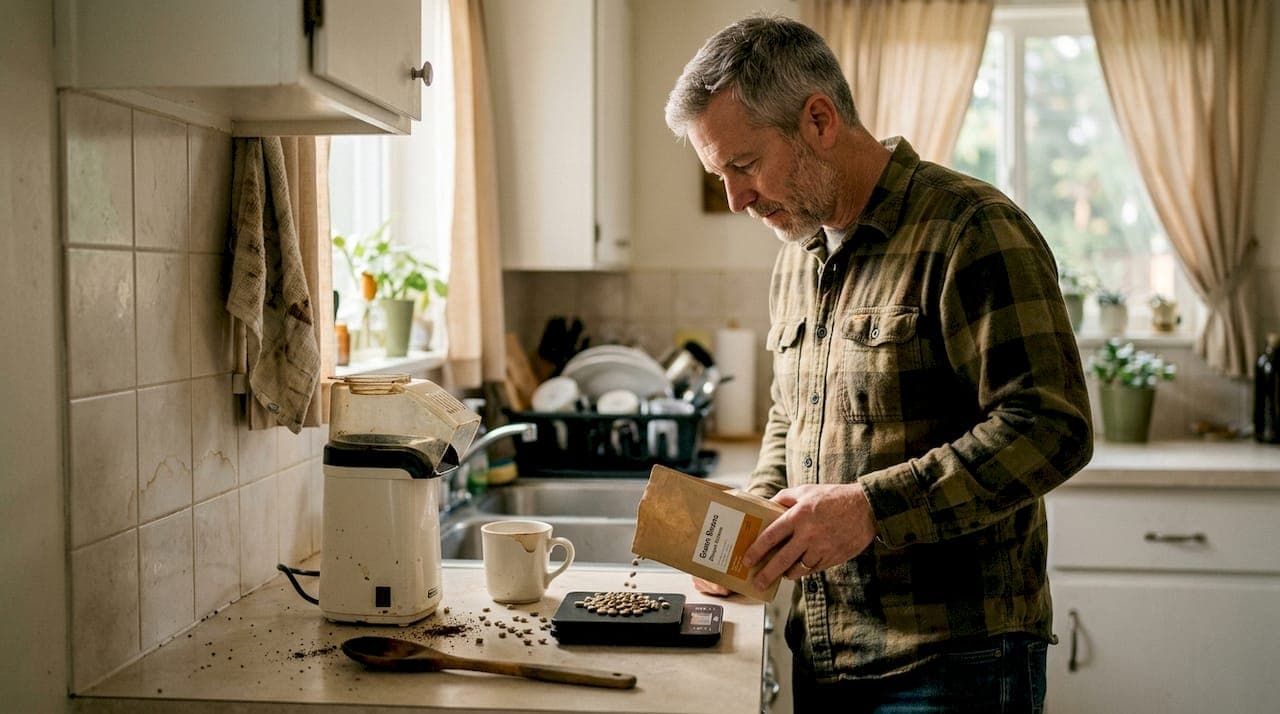
Let's dive into what you'll need before roasting your first batch. The good news is that you don't need a professional setup to get great results. A few key items and some patience go a long way.
Green coffee beans are your starting point. These are unroasted beans, and their quality sets the ceiling for your final cup. Look for beans labeled by origin, processing method, and harvest year. Fresher green beans, typically within a year of harvest, roast more predictably. You can explore a curated whole bean coffee selection to get a sense of what profiles you enjoy before sourcing green versions. The local coffee community in Colorado Springs is also a great resource for recommendations on where to buy quality green beans.
Your roasting equipment is the next decision. Here are your three main options:
- Oven: Accessible and free if you already have one, but heat distribution is uneven and results vary.
- Air popper (popcorn maker): Cheap, fast, and surprisingly effective for small batches. Great for beginners.
- Dedicated drum roaster: The most consistent option, with better airflow and temperature control. Worth the investment once you're hooked.
Beyond the roaster itself, you'll also need a kitchen scale for weighing green beans (aim for 50 to 100 gram batches when starting out), a thermometer to monitor ambient or bean temperature, and a cooling method such as two colanders to toss beans between, stopping the roast quickly.
| Tool | Purpose |
|---|---|
| Green coffee beans | Raw material for roasting |
| Air popper or drum roaster | Applies heat evenly to beans |
| Kitchen scale | Ensures consistent batch sizes |
| Thermometer | Monitors roasting temperature |
| Colanders (x2) | Rapid cooling to stop the roast |
| Timer | Tracks roast phase durations |
One detail worth noting: color consistency research confirms that bean color follows a universal curve across different origins and roast profiles, especially at key milestones like first crack. This means your eyes are a reliable tool no matter what beans you buy.
Pro Tip: Start with a single origin bean in small 75-gram batches. You'll learn how that bean responds to heat without burning through expensive stock.
Step-by-step coffee roasting process
With your coffee gear ready, you're set to start roasting. Follow these steps closely the first few times, and you'll build a feel for the process faster than you'd expect.
- Weigh and load your beans. Measure your green beans on the scale. Load them into your roaster before applying heat if using a drum roaster, or preheat your air popper for 30 seconds first.
- Preheat your roasting environment. For oven roasting, set it to 450°F and let it stabilize fully. For air poppers, a brief warm-up prevents uneven early heating.
- Drying phase (0 to 5 minutes). Beans start green and grassy smelling. They absorb heat but don't change color much yet. Keep stirring if using an oven.
- Yellowing phase (5 to 8 minutes). Beans shift from green to yellow, then to a tan color. A hay-like aroma develops. This is moisture leaving the bean.
- First crack (8 to 10 minutes). You'll hear a distinct popping sound, similar to popcorn but softer. Beans expand and lighten in color. This is your first major milestone.
- Development phase (1 to 3 minutes after first crack). This window defines your roast level. Pull earlier for light roasts, wait longer for medium.
- Second crack (if desired). A faster, quieter crackling sound signals second crack. Beans are now entering dark roast territory. Oils begin surfacing.
- Cool immediately. Pour beans into colanders and toss them in the air to drop temperature fast. Slow cooling continues the roast and can ruin your target level.
Research confirms that color at cracks is consistent across different bean origins and roast profiles, making visual cues a reliable standard you can apply batch after batch. If you enjoy a bright, clean cup similar to an Americano roast style, pulling just after first crack is usually your sweet spot.
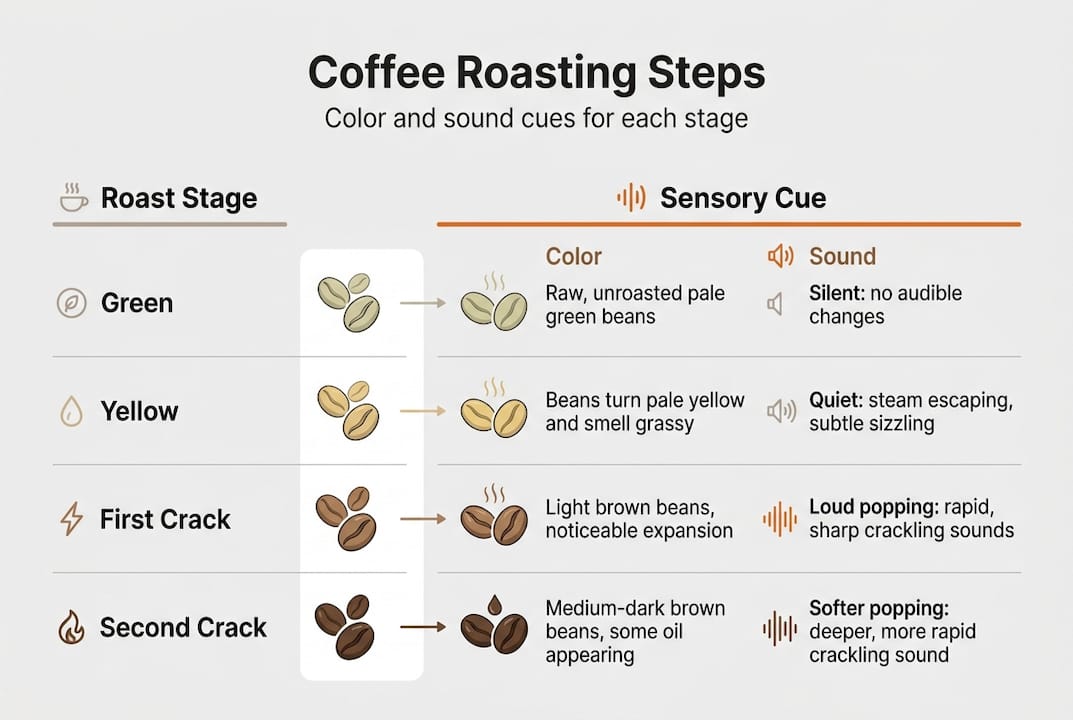
| Roast stage | Color | Sound cue |
|---|---|---|
| Green/drying | Pale green | None |
| Yellowing | Yellow to tan | None |
| First crack | Light brown | Loud popping |
| Development | Medium brown | Quiet |
| Second crack | Dark brown | Rapid crackling |
| Over-roast | Very dark, oily | Smoke |
Pro Tip: Stop the roast 30 seconds after first crack for a lighter, brighter cup with more origin flavor. The longer you wait, the more roast flavor dominates.
Troubleshooting and avoiding common mistakes
You've got your process down; next, avoid common pitfalls and fix mistakes as you go. Most home roasting errors fall into a few predictable categories, and knowing them in advance saves a lot of wasted beans.
Over-roasting is the most common beginner mistake. It happens when you lose track of time or can't hear the cracks clearly over ambient noise. Beans turn very dark, surface oils appear, and the cup tastes bitter and flat. Using empirical color benchmarks as your guide helps you catch this before it happens.
Under-roasting produces what's called a "baked" or grassy flavor. Beans look tan but haven't reached first crack. The sugars haven't caramelized, and the cup tastes sour or raw. If your drip coffee outcomes taste oddly sour after a home roast, under-development is likely the culprit.
Missing first crack entirely is a timing issue. It can happen if your heat is too low (crack never comes) or too high (crack happens so fast you miss it). Aim for first crack to arrive around 8 to 10 minutes in. If it takes longer than 12 minutes, your heat is too low.
Here are the most common mistakes and their fixes:
- Uneven color across the batch: Stir more frequently or reduce batch size for better airflow.
- Smoky, acrid smell before second crack: Heat is too high; reduce temperature immediately.
- Beans look right but taste flat: You may be "baking" them with too-low heat over too long a time. Increase heat and shorten the roast.
- Can't hear cracks: Use a quieter environment or reduce fan noise from the popper.
- Chaff catching fire: Keep a close eye during air popper roasting; chaff is flammable.
A latte flavor profile depends heavily on a well-developed medium roast, so if you're roasting for milk-based drinks, aim for a consistent medium and check color carefully.
Safety note: Always roast in a well-ventilated space or near an open window. Smoke from roasting can trigger smoke alarms, and rapid cooling releases heat quickly. Never leave an active roast unattended.
Checking your roast: benchmarks and quality cues
Once you've finished roasting, it's time to see how your results measure up. A quick post-roast check takes less than five minutes and gives you the data you need to improve your next batch.
- Check color uniformity. Spread cooled beans on a white surface. All beans should be a similar shade. Significant variation means uneven heat distribution during roasting.
- Look for surface oils. Light and medium roasts should look dry. Oily surfaces on a supposed medium roast signal you went too far.
- Listen for residual off-smells. Fresh roasted beans should smell chocolatey, nutty, or fruity depending on origin. A burnt or sulfurous smell means over-roasting.
- Check chaff removal. Most chaff should have blown off during roasting. Excess chaff clinging to beans suggests incomplete drying in the early phase.
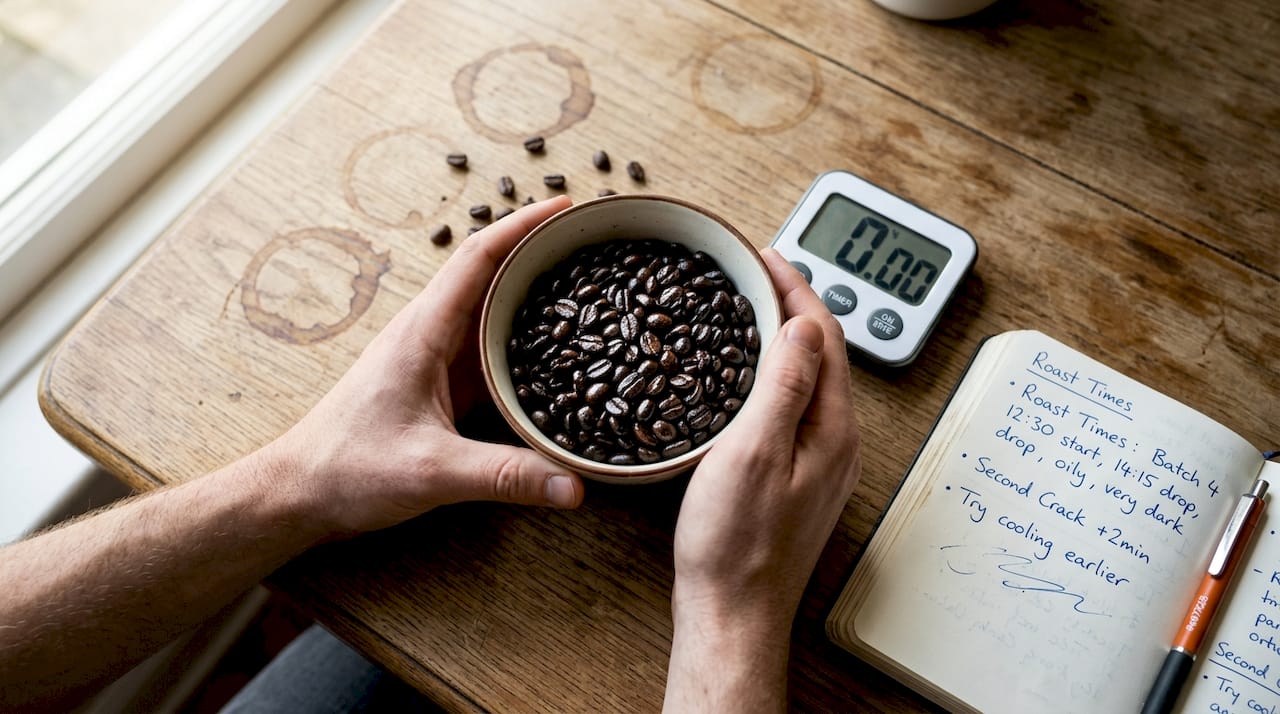
- Taste test after a 12-hour rest. Freshly roasted beans release CO2 aggressively and taste sharp. Let them degas overnight before brewing for an accurate flavor read.
The science backs up what your senses tell you: roast color at process milestones is consistent across bean types, making visual checks a reliable quality control method even without lab equipment. Compare your beans against reference photos of light, medium, and dark roasts to calibrate your eye over time.
For a reference point, check out coffee quality standards from specialty roasters to understand what well-developed beans look and taste like. If you're roasting for cold brew roast levels, aim for a darker medium that holds up well to extended cold extraction.
Keep a simple roasting log. Write down your bean origin, batch weight, roast time, first crack time, and pull time. After three or four batches, patterns emerge and adjustments become obvious.
Our take: why color and cracks are your roasting shortcut
Here's an opinion you won't hear often: the coffee world overcomplicates home roasting. Expensive Bluetooth-connected roasters, data-logging software, and specialty probes are genuinely useful for commercial operations, but for home brewing they can create more confusion than clarity. The truth is that color at cracks is consistent across origins and equipment types, which means your eyes and ears already give you 90% of the information you need.
Consistency in home roasting doesn't come from fancier tools. It comes from paying attention to the same two cues every single batch. Once you've heard first crack a dozen times, you'll recognize it instantly. Once you've seen the color shift from tan to light brown, you'll stop second-guessing yourself.
At Third Space Coffee, we believe approachable methods build better coffee culture than gatekeeping does. Start simple. Get good at reading color and cracks. Then, if you want to go deeper, the tools will make more sense because you'll know what you're measuring.
Elevate your coffee journey with Third Space Coffee
Ready to put your roasting knowledge into action? Whether you want to compare your home roasts against professionally roasted beans or simply stock up on inspiration, Third Space Coffee has you covered.

Shop our fresh whole bean coffee to taste what a well-developed roast should feel like in the cup. Explore our specialty drinks to experience different roast levels crafted by people who obsess over the details. And when you're ready to connect with Colorado Springs coffee culture in person, explore Third Space Coffee and see what we're brewing. Your next great batch starts here.
Frequently asked questions
How can I tell if my coffee is roasted correctly at home?
Look for consistent color progression through each phase and listen for a clear first crack. Color and cracks are universal quality indicators that apply regardless of your equipment or bean origin.
What are the signs of over-roasted coffee beans?
Beans that turn very dark and oily with a burnt smell are almost always over-roasted. Empirical benchmarks show that color darkens past quality thresholds quickly once you cross second crack, so pull early if in doubt.
Do I need a special roaster to start roasting coffee at home?
No, a basic air popper or even an oven works well for small batches. Color at cracks is consistent whether you use simple or professional equipment, so your results can be excellent either way.
How does altitude in Colorado Springs affect coffee roasting?
High altitude can shorten roast times slightly because water boils at a lower temperature, affecting moisture release in the beans. Focus on bean color and cracks rather than relying only on timers, since these benchmarks hold regardless of elevation.